Blog

  • Tropical Coconut Mango Ice Cream Recipe 🥭🥥🍦

    Nothing says summer quite like the refreshing combination of mango and coconut. This Tropical Coconut Mango Ice Cream is a dairy-free, creamy, and naturally sweet treat that blends the richness of coconut milk with the vibrant flavor of ripe mangoes. Perfect for hot days, this recipe brings a tropical paradise straight to your bowl.

    Why You’ll Love This Recipe

    ✅ Dairy-free & vegan-friendly
    ✅ No ice cream maker required
    ✅ Naturally sweetened with mangoes
    ✅ Smooth, creamy, and refreshing


    Ingredients You’ll Need

    2 ripe mangoes (peeled & chopped)

    1 can (400ml) full-fat coconut milk

    ½ cup coconut cream (for extra creaminess)

    ¼ cup honey or maple syrup (optional, adjust to taste)

    1 tsp vanilla extract

    A pinch of salt

    Step-by-Step Instructions

    1. Prepare the Mango

    Peel and chop ripe mangoes.

    Blend until smooth to make a mango puree.

    2. Mix the Base

    In a large bowl, whisk together coconut milk, coconut cream, vanilla extract, and a pinch of salt.

    Add honey or maple syrup if you want it sweeter.

    3. Combine & Chill

    Fold in the mango puree until well combined.

    Cover the mixture and refrigerate for at least 2–3 hours to chill.


    4. Freeze Without Ice Cream Maker

    Pour mixture into a freezer-safe container.

    Freeze for 6–8 hours, stirring every 2 hours to break up ice crystals.

    (If you have an ice cream maker, churn according to the manufacturer’s instructions.)

    5. Serve & Enjoy

    Scoop into bowls or cones.

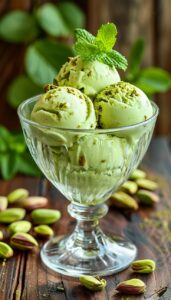
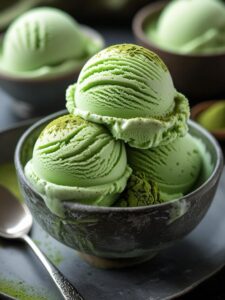
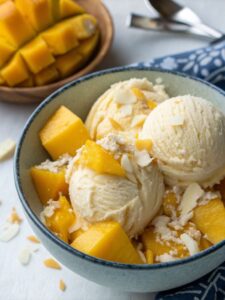
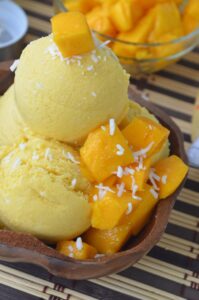
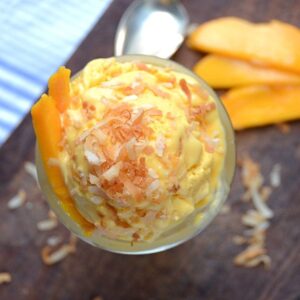
    Garnish with shredded coconut, fresh mango chunks, or mint leaves. 🌿


    Pro Tips

    Use fully ripe mangoes for the best natural sweetness.

    For extra creaminess, add 1 banana to the blend.

    Store in an airtight container to prevent freezer burn.

    Final Thoughts

    This homemade Coconut Mango Ice Cream is creamy, fruity, and tropical – the perfect summer dessert! Whether you’re vegan, lactose-intolerant, or just looking for a healthier alternative to store-bought ice cream, this recipe is a must-try.

  • Oreo Cookie Ice Cream Recipe 🍪🍦 (Creamy & Delicious)

    Introduction

    Who doesn’t love Oreos? These chocolatey, creamy cookies have become a worldwide favorite snack—and when combined with ice cream, they create pure dessert magic. Oreo cookie ice cream is one of the most popular flavors in the world, and the best part is—you can easily make it at home with or without an ice cream maker.

    This guide will walk you through everything you need to know about making Oreo ice cream: ingredients, step-by-step method, variations, tips, and storage. Whether you’re a beginner or a dessert lover, this recipe is simple, fun, and irresistibly tasty.

    Why You’ll Love This Recipe

    ✅ No complicated ingredients – just cream, milk, sugar, and Oreos.
    ✅ Can be made with or without an ice cream machine.
    ✅ Perfect for kids, parties, and late-night cravings.
    ✅ Creamy, crunchy, and full of cookies in every bite!


    Ingredients for Oreo Cookie Ice Cream

    Here’s what you’ll need:

    2 cups (480 ml) heavy cream (cold)

    1 cup (240 ml) whole milk

    ¾ cup (150 g) sugar

    1 tsp vanilla extract

    15–20 Oreo cookies (crushed into chunks)

    Step-by-Step Instructions

    1. Make the Ice Cream Base

    In a mixing bowl, whisk together the heavy cream, milk, sugar, and vanilla extract.

    Stir until the sugar completely dissolves.

    2. Crush the Oreos

    Place the Oreos in a ziplock bag and crush them with a rolling pin.

    Keep them chunky (not powdered) so you get cookie bites in every scoop.

    3. Mix Everything

    Add the crushed Oreos into the cream mixture.

    Stir well so the cookies are evenly distributed.

    4. Freeze (Without Machine)

    Pour the mixture into an airtight container.

    Freeze for 6–8 hours, stirring every 2 hours to prevent ice crystals.


    5. Churn (With Ice Cream Maker)

    If using a machine, pour the mixture into it and churn for 20–25 minutes.

    Once thick, transfer to a container and freeze for 2 hours before serving.


    Tips for the Best Oreo Ice Cream

    Extra Creamy: Use heavy cream with at least 35% fat.

    Chunky Delight: Add bigger Oreo pieces at the end for crunch.

    Swirls of Goodness: Mix in chocolate syrup or caramel for a richer flavor.

    Fun Twist: Try Golden Oreos, mint Oreos, or peanut butter Oreos for different flavors.


    Variations You’ll Love

    🍫 Chocolate Oreo Ice Cream – Add 2 tbsp cocoa powder to the base.
    🍦 No-Dairy Oreo Ice Cream – Use coconut cream and almond milk instead of dairy.
    🍪 Oreo Ice Cream Sandwiches – Scoop ice cream between two Oreo cookies for a mini treat.

    How to Store

    Store in an airtight container in the freezer.

    Best eaten within 2 weeks for maximum freshness.

    To serve, let it sit at room temperature for 5 minutes to soften.


    Conclusion

    Homemade Oreo cookie ice cream is creamy, crunchy, and downright delicious. With just a few ingredients and simple steps, you can whip up this irresistible dessert at home. Perfect for summer days, parties, or just satisfying your sweet tooth—this recipe is sure to become a family favorite.

    So grab a pack of Oreos and start making your own batch of happiness today! 🍨✨

  • Pistachio Rose Ice Cream Recipe 🌸🍨 (Unique & Flavorful)

    If you’re an ice cream lover always looking for something new, this Pistachio Rose Ice Cream will blow your mind. With the nutty richness of pistachios and the delicate floral notes of rose, this frozen treat feels royal and refreshing.

    Why You’ll Love This Recipe

    🌿 Made with Natural Ingredients – No artificial flavors, just real pistachios and rose water.

    🍦 Rich & Creamy Texture – Smooth and luscious, just like gourmet ice cream.

    🌸 Unique Flavor Combination – Nutty pistachio paired with fragrant rose.

    🥶 No Ice Cream Maker Needed – Easy method for beginners.


    Ingredients (4 Servings)

    2 cups full cream milk

    1 cup fresh cream

    ¾ cup sugar (or honey as a natural sweetener)

    ½ cup unsalted pistachios (peeled & finely ground)

    1 tbsp rose water (food grade)

    A few drops of natural rose essence (optional)

    Chopped pistachios & dried rose petals (for garnish)

    Step-by-Step Instructions

    Step 1: Make Pistachio Paste

    Soak pistachios in hot water for 5 minutes, then peel.

    Grind them into a smooth paste.

    Step 2: Prepare Ice Cream Base

    Heat milk and sugar in a saucepan until sugar dissolves.

    Add pistachio paste and cook for 5–7 minutes on low heat.

    Allow to cool slightly, then mix in fresh cream.

    Step 3: Add Rose Flavor

    Stir in rose water and rose essence for aroma.


    Step 4: Chill & Freeze

    Pour mixture into an airtight container and chill for 1 hour in the fridge.

    Transfer to the freezer. Whisk every 2 hours to avoid ice crystals (repeat 3–4 times).

    Step 5: Serve & Garnish

    Once set, scoop into bowls.

    Garnish with chopped pistachios and rose petals.


    Pro Tips

    ✔ Add condensed milk for an even creamier texture.
    ✔ Replace sugar with honey or jaggery for a healthier version.
    ✔ Add a few saffron strands for a richer flavor.

    Nutrition (Per Serving)

    Calories: ~280 kcal

    Protein: 6g

    Fat: 16g

    Carbs: 24g


    Final Thoughts

    Pistachio Rose Ice Cream is a luxurious and unique homemade dessert. Perfect for family gatherings, Eid dinners, summer parties, or whenever you crave something extraordinary.

  • Avocado Honey Ice Cream Recipe – A Healthy & Creamy Delight 🥑🍯

    Introduction

    When we think of ice cream, we usually imagine something rich, sweet, and indulgent. But what if an ice cream could be both healthy and delicious? That’s where Avocado Honey Ice Cream comes in! This recipe combines the creamy texture of ripe avocados with the natural sweetness of honey to create a refreshing frozen dessert that is both nutritious and satisfying.

    Why Avocado Honey Ice Cream?

    Healthy fats from avocado make it extra creamy.

    No refined sugar – sweetened naturally with honey.

    A perfect dessert for people who love healthy lifestyle choices.

    Unique flavor that’s refreshing and different from traditional ice cream.


    Ingredients You’ll Need

    Ripe Avocados – 2 medium (peeled & pitted)

    Heavy Cream – 1 cup

    Whole Milk – ½ cup

    Honey – ½ cup (adjust to taste)

    Lime Juice – 1 tablespoon (prevents browning)

    Vanilla Extract – 1 teaspoon

    Pinch of Salt

    Step-by-Step Recipe

    Step 1: Blend the Base

    In a blender, add avocado flesh, honey, lime juice, vanilla extract, and a pinch of salt.

    Blend until smooth and creamy.

    Step 2: Add Dairy

    Add heavy cream and milk to the blender.

    Blend again until the mixture is silky smooth.


    Step 3: Chill the Mixture

    Pour the mixture into a bowl.

    Cover and refrigerate for at least 3–4 hours.

    Step 4: Churn & Freeze

    Pour the chilled mixture into an ice cream maker and churn until creamy.

    Transfer to an airtight container and freeze for 5–6 hours.


    Serving Suggestions 🍨

    Serve scoops topped with crushed nuts or coconut flakes.

    Drizzle extra honey on top for a sweeter touch.

    Pair with dark chocolate chips for a rich combo.

    Tips & Variations

    Dairy-Free Version: Replace cream & milk with coconut milk.

    Extra Sweetness: Add dates or maple syrup instead of honey.

    Citrusy Twist: Add lemon zest for a refreshing flavor.


    Conclusion

    Avocado Honey Ice Cream is not just a dessert – it’s a healthy indulgence. Creamy, sweet, and loaded with nutrients, it’s the perfect frozen treat for health-conscious foodies. Try this unique recipe at home and impress your family with a dessert that’s both guilt-free and delicious.

  • Ultimate Guide to Making Homemade Vanilla Ice Cream 🍦

    Introduction

    Ice cream is one of the world’s most loved desserts, enjoyed by people of all ages. While markets are filled with countless flavors, nothing beats the creamy, rich, and fresh taste of homemade vanilla ice cream. The best part? You don’t need fancy machines or expensive ingredients to make it at home. This article will guide you step by step on how to prepare a classic vanilla ice cream recipe that’s smooth, delicious, and customizable.

    Why Vanilla Ice Cream?

    Vanilla is often called the queen of flavors. It’s simple yet versatile – you can enjoy it plain, top it with chocolate syrup, or pair it with warm brownies, pies, or fresh fruits. Plus, vanilla ice cream serves as the base flavor for many other recipes like milkshakes, sundaes, and ice cream cakes.

    Ingredients You’ll Need

    To make creamy vanilla ice cream, you only need a few simple ingredients:

    2 cups heavy cream

    1 cup whole milk

    ¾ cup sugar

    1 tbsp pure vanilla extract

    A pinch of salt

    (Optional) Vanilla bean for extra richness

    Step-by-Step Recipe

    Step 1: Prepare the Base

    In a medium saucepan, combine the milk, sugar, and salt. Stir over medium heat until the sugar completely dissolves. Remove from heat.

    Step 2: Add Cream & Vanilla

    Stir in the heavy cream and vanilla extract (or scraped vanilla bean seeds). Mix well.

    Step 3: Chill the Mixture

    Pour the mixture into a bowl and refrigerate for at least 2–4 hours (or overnight). Chilling helps in achieving a smoother texture.

    Step 4: Freeze Without a Machine (Easy Method)

    Pour the chilled mixture into a freezer-safe container.

    Freeze for 30 minutes, then stir with a spoon or whisk to break ice crystals.

    Repeat every 30 minutes for 3–4 hours until creamy.

    (If you have an ice cream maker, simply churn the chilled mixture as per the manufacturer’s instructions.)

    Tips for Perfect Vanilla Ice Cream

    Always use pure vanilla extract for authentic flavor.

    Chill the mixture properly before freezing – this step is crucial.

    To make it extra creamy, add 2 egg yolks while heating the milk mixture (custard-style base).


    Variations to Try

    Chocolate Chip Vanilla – Add mini chocolate chips in the last 10 minutes of freezing.

    Strawberry Swirl – Mix in strawberry puree before freezing.

    Nutty Delight – Fold in chopped almonds, pistachios, or cashews.


    Healthier Options

    Replace sugar with honey or maple syrup.

    Use low-fat milk for a lighter version.

    Add fresh fruits instead of artificial flavorings.

    Serving Ideas

    Serve scoops in a cone for a classic experience.

    Pair with hot brownies or apple pie for a café-style dessert.

    Top with caramel or chocolate syrup for extra indulgence.


    Final Thoughts

    Homemade vanilla ice cream is not just a recipe – it’s an experience. It’s easy to make, customizable, and far healthier than most store-bought versions. Once you try this recipe, you’ll never look at packaged ice creams the same way again. So grab your ingredients and start churning – your perfect bowl of creamy vanilla goodness awaits! 🍨

  • Chocolate Brownie Ice Cream Recipe 🍨🍫

    Who doesn’t love the combination of rich chocolate brownies and creamy ice cream? This recipe brings both together in a single scoop of joy. The fudgy brownie chunks mixed with smooth vanilla ice cream create a heavenly dessert that chocolate lovers will adore. It’s not just a recipe, it’s an experience of indulgence.

    Ingredients

    2 cups vanilla ice cream (homemade or store-bought, softened)

    1 cup brownie chunks (freshly baked or leftover)

    2 tbsp chocolate syrup

    ½ cup whipped cream

    2 tbsp chopped walnuts or almonds (optional)


    Instructions

    Step 1: Prepare the Brownie Chunks

    Cut brownies into small bite-sized cubes.

    Keep them slightly chewy, not too dry.


    Step 2: Mix the Ice Cream Base

    Take softened vanilla ice cream in a large bowl.

    Add whipped cream for extra smoothness.

    Step 3: Combine & Swirl

    Gently fold brownie chunks into the ice cream.

    Drizzle chocolate syrup and swirl lightly for a marble effect.

    Step 4: Freeze & Set

    Pour mixture into an airtight container.

    Freeze for 6 hours or overnight until firm.


    Step 5: Serve & Enjoy

    Scoop into bowls or cones.

    Garnish with extra brownie pieces and nuts.


    Tips for the Best Chocolate Brownie Ice Cream

    Use fudgy brownies instead of cakey ones for rich texture.

    Add a pinch of sea salt to enhance chocolate flavor.

    Swirl in caramel sauce for a gourmet twist.

    Final Thoughts

    Chocolate brownie ice cream is a true crowd-pleaser. Whether you’re making it for a party, a family dinner, or just a personal treat, it guarantees happiness in every bite. Once you try this recipe, it’ll surely become your all-time favorite frozen dessert.

  • Homemade Strawberry Ice Cream 🍓 | Fresh & Creamy Recipe

    Strawberry ice cream is a timeless classic that combines the freshness of ripe strawberries with the creamy richness of ice cream. Unlike artificial strawberry-flavored tubs from stores, homemade strawberry ice cream gives you the natural sweetness, fruity aroma, and smooth texture that feels refreshing in every bite.

    In this recipe, you’ll learn how to make strawberry ice cream at home — both with and without an ice cream maker — along with tips and variations to make it extra special.

    Why Strawberry Ice Cream?

    🍓 Natural sweetness – Fresh strawberries bring a juicy and tangy flavor.

    🥛 Creamy texture – A perfect balance of fruit and cream.

    🌿 Customizable – Add chocolate, nuts, or fruit chunks.

    💕 Everyone’s favorite – Kids and adults love it equally.


    Ingredients (Basic Recipe)

    2 cups fresh strawberries (hulled and chopped)

    ¾ cup sugar (adjust to taste)

    2 cups heavy cream (chilled)

    1 cup whole milk

    1 tsp vanilla extract

    A pinch of salt

    Step-by-Step Instructions

    Step 1: Prepare the Strawberries

    1. Place chopped strawberries in a bowl.

    2. Add ¼ cup sugar and let them sit for 20–30 minutes (this process is called maceration, which helps release natural juices).

    3. Blend the strawberries into a smooth puree (keep some chunks if you like texture).

    Step 2: Make the Ice Cream Base

    1. In another bowl, whisk together heavy cream, milk, remaining sugar, vanilla extract, and salt.

    2. Stir until the sugar dissolves.


    Step 3: Combine

    Mix the strawberry puree into the cream mixture.

    Stir well until fully combined.

    Step 4: Freeze

    Without Ice Cream Maker: Pour mixture into an airtight container. Freeze for 6–8 hours, stirring every 2 hours to avoid ice crystals.

    With Ice Cream Maker: Churn according to the machine instructions until creamy and thick, then freeze for 2–3 hours before serving.

    Flavor Variations 🍨

    Strawberry Chocolate Chip – Add mini chocolate chips for a crunchy bite.

    Strawberry Cheesecake – Swirl in cream cheese and crushed biscuits.

    Strawberry Banana – Blend half a banana with strawberries for extra creaminess.

    Strawberry Swirl – Add homemade strawberry syrup before freezing for a ripple effect.


    Serving Ideas

    Scoop into waffle cones for a classic summer treat.

    Serve with fresh strawberry slices on top.

    Pair with warm brownies or cake for a rich combo.

    Add whipped cream and sprinkles for kids’ delight.


    Healthier Alternatives

    Replace heavy cream with coconut cream for a dairy-free option.

    Use honey or stevia instead of sugar.

    Add Greek yogurt for a tangy, protein-rich version.


    Final Thoughts

    Homemade strawberry ice cream is a refreshing, fruity dessert that never goes out of style. With just a handful of ingredients and some patience, you can create a creamy, delicious, and natural ice cream that tastes far better than store-bought versions.

    So, grab some fresh strawberries and turn them into a bowl of happiness today! 🍓🍨✨

  • 🌿 Matcha White Chocolate Swirl Ice Cream – A Luxurious Treat

    Ice cream lovers are always on the hunt for something refreshing yet indulgent. While vanilla and chocolate remain classics, Matcha White Chocolate Swirl Ice Cream is a modern twist that combines the earthy notes of Japanese green tea with the creamy sweetness of white chocolate. This recipe not only delights the taste buds but also looks stunning with its green-and-white marble effect.

    🍨 Why Try Matcha White Chocolate Ice Cream?

    Unique Flavor Fusion – The slight bitterness of matcha balances perfectly with the rich sweetness of white chocolate.

    Antioxidant Boost – Matcha is loaded with antioxidants that support wellness.

    Elegant Dessert – Its swirl pattern makes it a picture-perfect dessert for parties.


    🛒 Ingredients You’ll Need

    2 cups heavy cream

    1 cup whole milk

    ¾ cup sugar

    2 tbsp matcha green tea powder (culinary grade)

    1 tsp vanilla extract

    A pinch of salt

    120g (about 1 cup) white chocolate, melted

    👩‍🍳 Step-by-Step Instructions

    Step 1: Prepare the Base

    1. In a saucepan, combine the milk, sugar, and salt.

    2. Warm over medium heat until the sugar dissolves.

    3. Remove from heat and stir in the vanilla extract.


    Step 2: Matcha Mixture

    1. In a small bowl, whisk matcha powder with 3 tbsp of hot water until smooth (to avoid lumps).

    2. Add this mixture to the warm milk base and whisk well.


    Step 3: Add Cream & Chill

    1. Stir in the heavy cream.

    2. Chill the mixture in the fridge for at least 2–3 hours (or overnight for best results).

    Step 4: Churn the Ice Cream

    1. Pour the chilled base into your ice cream maker.

    2. Churn according to manufacturer instructions until thick and creamy.


    Step 5: Swirl with White Chocolate

    1. Transfer half of the churned ice cream into a container.

    2. Drizzle melted white chocolate on top.

    3. Add the remaining ice cream and swirl more chocolate through with a spoon to create a marble effect.


    Step 6: Freeze & Serve

    1. Cover the container and freeze for at least 4–5 hours.

    2. Scoop, serve, and enjoy the luxurious green-and-white swirls.

    🍴 Serving Ideas

    Top with shaved white chocolate for extra indulgence.

    Pair with almond cookies for crunch.

    Serve in waffle cones for a café-style presentation.

    🌟 Final Thoughts

    This Matcha White Chocolate Swirl Ice Cream is not just dessert—it’s an experience. It combines tradition (matcha) with luxury (white chocolate), making it a perfect centerpiece for your recipe collection. Whether you’re hosting friends or simply treating yourself, this unique flavor will leave everyone impressed.

  • ‎🍫 Homemade Chocolate Ice Cream Recipe – Rich & Creamy Delight

    ‎Chocolate lovers ke liye duniya ka sabse favourite dessert hai Chocolate Ice Cream. Iski creamy texture aur deep cocoa flavor har bite ko irresistible banata hai. Achhi baat yeh hai ke aap isse easily ghar par bana sakte ho without any fancy ice cream machine.


    ‎📝 Ingredients You’ll Need

    ‎Full cream milk – 2 cups

    ‎Fresh cream – 1 cup (chilled)

    ‎Cocoa powder – 3 tbsp (unsweetened)

    ‎Chocolate syrup – ¼ cup (ya melted dark chocolate)

    ‎Sugar – ¾ cup

    ‎Cornflour – 1 tbsp (for thickness)

    ‎Vanilla essence – 1 tsp

    ‎A pinch of salt (flavor enhance karne ke liye)


    ‎👩‍🍳 Step-by-Step Recipe

    ‎1. Make the Chocolate Base

    ‎Ek pan mein milk garam karein. Thoda milk alag nikal kar cornflour slurry bana lein. Garam milk mein sugar aur cocoa powder daal kar whisk karein taake lumps na bane.

    ‎2. Add Cornflour for Creaminess

    ‎Cornflour slurry daal kar continuously stir karein. Jaise hi mixture thoda thick ho jaye, gas off kar dein.

    ‎3. Mix Chocolate Syrup & Vanilla

    ‎Jab mixture slightly cool ho jaye, usme chocolate syrup aur vanilla essence add karke achhi tarah mix karein.

    ‎4. Blend with Cream

    ‎Room temperature par thanda hone ke baad chilled fresh cream add karein aur gently fold karein.

    ‎5. Freeze & Whisk

    ‎Mixture ko airtight container mein daal kar freezer mein 2 ghante ke liye rakhein. 2 ghante baad nikal kar fork ya hand whisk se beat karein taake ice crystals na bane. Ye process 2–3 dafa repeat karein.

    ‎6. Final Freeze

    ‎Ice cream ko 6–7 ghante ya overnight freeze hone dein.


    ‎‎🍨 Serving Ideas

    ‎Upar se chocolate chips ya grated chocolate sprinkle karein

    ‎Hot brownies ke saath serve karein (classic brownie with chocolate ice cream combo)

    ‎Waffle cones mein serve karke kids-friendly treat banayein

    ‎Extra chocolate drizzle karke indulgent look dein

    ‎⭐ Why You’ll Love This Recipe

    ‎✔️ Rich chocolate flavor with creamy texture
    ‎✔️ Bina ice cream maker ke simple method
    ‎✔️ Perfect for kids & chocolate lovers
    ‎✔️ Easily customizable with nuts, choco chips, ya fudge

  • ☕🍦 Coffee Caramel Crunch Ice Cream – A Treat for Coffee Lovers!

    If you’re a true coffee lover and enjoy a mix of sweetness and crunch, then this Coffee Caramel Crunch Ice Cream will become your new favorite dessert. It’s creamy, rich, and packed with layers of coffee flavor, caramel swirls, and crunchy biscuit bites. The best part? You can easily make it at home without an ice cream machine!

    📝 Ingredients You’ll Need

    Full cream milk – 2 cups

    Fresh cream – 1 cup (chilled)

    Sugar – ¾ cup

    Instant coffee – 2 tbsp (for strong flavor)

    Caramel sauce – ½ cup (homemade or store-bought)

    Crushed biscuits or wafers – ½ cup (for crunch)

    Vanilla essence – 1 tsp

    Cornflour – 1 tbsp (for thickening)

    👩‍🍳 Step-by-Step Recipe

    1. Prepare the Coffee Base

    In a pan, heat the milk. Keep a little aside to make a cornflour slurry. Add sugar and instant coffee into the hot milk and whisk until dissolved.


    2. Thicken the Mixture

    Add the cornflour slurry and keep stirring until the mixture slightly thickens into a creamy base. Turn off the heat and let it cool.


    3. Mix in Cream & Vanilla

    Once the mixture comes to room temperature, fold in the chilled fresh cream and vanilla essence. Mix well.

    4. Layer with Caramel & Crunch

    Pour half of the coffee mixture into an airtight container, drizzle caramel sauce, and sprinkle crushed biscuits. Repeat the layers until everything is used up.


    5. Freeze & Whisk

    Freeze for 2–3 hours. Then take it out and whisk (or mash with a fork) to break ice crystals. Repeat this step 2–3 times for a smooth texture.


    6. Final Freeze

    Freeze overnight or for 6–7 hours until firm. Scoop, serve, and enjoy the heavenly flavors!


    🍨 Serving Ideas

    Top with extra caramel drizzle for indulgence

    Add some chocolate chips or nuts for extra crunch

    Serve in waffle cones or glass cups for a café-style vibe

    Try it affogato-style by serving with an espresso shot

    ⭐ Why You’ll Love This Recipe

    ✔️ Perfect balance of coffee, caramel, and crunch
    ✔️ Easy to make without an ice cream maker
    ✔️ Ideal dessert for parties or family gatherings
    ✔️ A must-try for coffee enthusiasts