Blog

  • 🍉 Watermelon Ice Cream Recipe – Refreshing Summer Treat 🍦✨

    Introduction

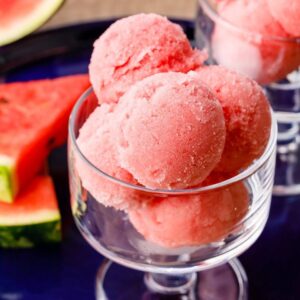
    When the summer heat is at its peak, nothing feels better than a cold, refreshing dessert. Among all fruits, watermelon is the ultimate summer champion — hydrating, juicy, and naturally sweet. Pair it with creamy ice cream, and you get the perfect balance of fruity freshness and smooth indulgence.

    In this article, you’ll learn how to make homemade watermelon ice cream with simple ingredients, step-by-step instructions, and pro tips for the creamiest texture. Whether you’re making it for a family gathering, kids’ treat, or just to beat the heat, this recipe is guaranteed to impress.

    Ingredients You’ll Need

    3 cups fresh watermelon (seedless & cubed)

    1 cup heavy cream (chilled)

    1/2 cup condensed milk (for sweetness & creaminess)

    2 tbsp sugar (optional, adjust to taste)

    1 tsp lemon juice (enhances flavor)

    A pinch of salt


    Step-by-Step Recipe

    Step 1: Prepare the Watermelon

    Cut fresh watermelon into small cubes.

    Remove any seeds.

    Blend until smooth to create a watermelon puree.


    Step 2: Mix the Cream Base

    In a bowl, whip heavy cream until soft peaks form.

    Gently fold in condensed milk and sugar.

    Step 3: Combine Flavors

    Add watermelon puree, lemon juice, and a pinch of salt into the cream mixture.

    Stir gently until fully combined.

    Step 4: Freeze

    Pour the mixture into an airtight container.

    Freeze for 6–8 hours, stirring every 2 hours to avoid ice crystals.

    Step 5: Serve & Enjoy

    Scoop into bowls or cones.

    Garnish with watermelon slices or mint leaves for an aesthetic summer vibe.

    Pro Tips for Best Results

    ✅ Use chilled cream for better whipping.
    ✅ Balance sweetness according to watermelon’s natural sugar.
    ✅ For extra creaminess, churn in an ice cream maker.
    ✅ Add chocolate chips for a “watermelon seeds” look!


    Why You’ll Love This Recipe

    No artificial flavors, 100% natural fruit-based dessert.

    Refreshing, light, and perfect for hot weather.

    Easy to make without fancy equipment.

    Kids and adults both love it!

    Conclusion

    Homemade watermelon ice cream is the ultimate summer dessert — fresh, creamy, and absolutely irresistible. Try this recipe once, and it’ll become your seasonal favorite.

  • Guava & Cream Ice Cream 🍈🍦 Tropical Sweetness

    Introduction

    Guava – the tropical fruit with its floral aroma and sweet-tangy taste – is a flavor that instantly takes you to sunny days and island vibes. 🌴🍈 Imagine pairing that with the velvety richness of cream, and you have the ultimate summer treat: Guava & Cream Ice Cream 🍦.

    This recipe is unique because guava isn’t a typical ice cream flavor, yet it blends beautifully with cream to create a refreshing, tropical, and creamy dessert. Whether you’re craving something different for a family gathering, a summer party, or just a personal indulgence, this ice cream is guaranteed to surprise and delight.

    Ingredients You’ll Need 🛒

    For the Ice Cream Base:

    2 cups heavy cream 🥛

    1 cup whole milk

    ¾ cup sugar

    4 large egg yolks

    1 tsp vanilla extract

    Pinch of salt

    For the Guava Flavor:

    2 cups ripe guava pulp (strained to remove seeds) 🍈

    2 tbsp lemon juice (enhances flavor) 🍋

    3–4 tbsp sugar (adjust depending on guava’s sweetness)

    For the Cream Swirl:

    ½ cup whipped cream (lightly sweetened)

    Step-by-Step Recipe 👩‍🍳

    1. Prepare the Guava Puree

    Peel guavas, remove seeds, and blend the pulp until smooth.

    Strain to remove any leftover seeds.

    Add lemon juice and sugar. Mix well and chill.


    2. Make the Ice Cream Base

    1. In a saucepan, heat milk, cream, and half the sugar until warm.

    2. In a bowl, whisk egg yolks with the remaining sugar until pale.

    3. Slowly add the warm mixture into the yolks while whisking.

    4. Return mixture to the pan and cook on low until it thickens (coats the back of a spoon).

    5. Remove from heat, stir in vanilla, and let it cool completely.


    3. Blend the Flavors

    Once the base is cool, fold in guava puree.

    Mix gently to retain the fruity aroma.


    4. Churn the Ice Cream

    Pour into an ice cream maker and churn until creamy.

    If you don’t have an ice cream maker, freeze in a container, stirring every 30 minutes until smooth.

    5. Add the Cream Swirl

    Fold in lightly sweetened whipped cream in swirls to create a marbled effect.


    6. Freeze & Serve

    Transfer to a container, cover, and freeze for at least 6 hours.

    Scoop and enjoy the tropical goodness of guava with creamy richness 🍈🍦.


    Variations to Try ✨

    Guava & Coconut Ice Cream: Add coconut milk for a tropical island twist. 🥥

    Guava Cheesecake Ice Cream: Fold in cheesecake chunks for indulgence. 🍰

    Spiced Guava Ice Cream: Add a hint of cinnamon or cardamom for warmth. 🌸


    Pro Tips 💡

    Use ripe guavas for the best flavor and aroma.

    Don’t skip straining – it gives a silky smooth texture.

    Chill the guava puree before mixing to prevent ice crystals.

    FAQs ❓

    Q1: Can I use guava juice instead of fresh guava?
    👉 Yes, but fresh guava pulp gives a stronger, natural flavor.

    Q2: How long can I store it?
    👉 Up to 2 weeks in an airtight container in the freezer.

    Q3: Can I make it vegan?
    👉 Yes! Use coconut cream + almond milk, and swap whipped cream with coconut cream.


    Final Thoughts 💭

    Guava & Cream Ice Cream 🍈🍦 Tropical Sweetness is not just another frozen dessert—it’s a refreshing tropical escape in every bite. With its fruity sweetness, creamy swirls, and exotic taste, this ice cream is perfect for summer days, tropical-themed parties, or anyone craving something truly different. 🌞

  • Red Velvet Ice Cream Love ❤️🍦 – A Decadent Dessert for Every Occasion

    Introduction

    Red velvet has always been a symbol of love, elegance, and indulgence. From cakes to cupcakes, this rich flavor has captured hearts worldwide. But have you ever tried Red Velvet Ice Cream? 🧁🍦

    This recipe combines the creaminess of homemade ice cream with the charm of red velvet cake crumbs and a swirl of cream cheese frosting. The result is a luxurious frozen treat that looks as good as it tastes. Whether you’re planning a Valentine’s Day surprise, a birthday dessert, or simply want to impress your family, this Red Velvet Ice Cream Love ❤️🍦 will be your showstopper.

    Ingredients You’ll Need 🛒

    For the Ice Cream Base:

    2 cups heavy cream 🥛

    1 cup whole milk

    ¾ cup sugar

    4 large egg yolks

    1 tsp vanilla extract

    Pinch of salt

    For the Red Velvet Flavor:

    1 cup red velvet cake crumbs (freshly baked or store-bought) 🍰

    2 tbsp cocoa powder

    2 tbsp red food coloring (adjust as needed)

    For the Cream Cheese Swirl:

    4 oz cream cheese (softened)

    ¼ cup powdered sugar

    2 tbsp milk

    ½ tsp vanilla extract

    Step-by-Step Recipe 👩‍🍳

    1. Prepare the Ice Cream Base

    1. In a saucepan, heat milk, cream, and half the sugar until warm.

    2. In a bowl, whisk egg yolks with the remaining sugar.

    3. Slowly pour the warm milk mixture into the yolks while whisking.

    4. Return mixture to the saucepan and cook on low heat until it coats the back of a spoon.

    5. Remove from heat, stir in vanilla and salt. Let cool completely.


    2. Add the Red Velvet Touch

    Mix cocoa powder and red food coloring into the cooled base.

    Stir in red velvet cake crumbs for that authentic flavor.

    3. Churn the Ice Cream

    Pour the mixture into an ice cream maker and churn until creamy.

    If you don’t have an ice cream maker, freeze in a container, stirring every 30 minutes until smooth.


    4. Add the Cream Cheese Swirl

    Whisk cream cheese, sugar, milk, and vanilla until smooth.

    Gently fold into the churned ice cream for a marbled effect.

    5. Freeze & Serve

    Transfer to a container, cover, and freeze for at least 6 hours.

    Scoop, serve, and enjoy the love in every bite ❤️🍦


    Variations to Try ✨

    Red Velvet Oreo Ice Cream: Add crushed Oreos for extra crunch.

    Red Velvet Cheesecake Ice Cream: Add mini cheesecake bites for indulgence.

    Vegan Option: Use coconut milk, almond milk, and vegan cream cheese.


    Pro Tips 💡

    Chill the mixture overnight for a smoother texture.

    Use gel food coloring for a richer red color.

    Don’t over-mix the cream cheese swirl—keep it marbled for a beautiful look.

    FAQs ❓

    Q1: Can I make this ice cream without an ice cream maker?
    👉 Yes! Just freeze the mixture in a container and stir every 30 minutes until creamy.

    Q2: How long can I store it?
    👉 Up to 2 weeks in an airtight container in the freezer.

    Q3: Can I use boxed red velvet cake mix for crumbs?
    👉 Absolutely! Bake a small batch, crumble it, and add it in.


    Final Thoughts 💭

    Red Velvet Ice Cream Love ❤️🍦 is not just another dessert—it’s an experience of love, luxury, and flavor. Perfect for romantic dinners, festive gatherings, or a personal indulgence, this recipe will make you fall in love with ice cream all over again.

  • Refreshing Twist: Lemon Blueberry Ice Cream 🍋🫐

    When it comes to summer desserts, nothing beats the refreshing and fruity flavor of lemon blueberry ice cream. This recipe combines the zesty tang of lemon with the sweet juiciness of blueberries, creating a creamy treat that feels both light and indulgent. Whether you’re hosting a summer party, craving something different, or simply love fruity ice creams, this one will surely win your heart.

    Why You’ll Love This Ice Cream

    Refreshing Flavors: The citrusy kick of lemon pairs perfectly with the sweetness of blueberries.

    Easy to Make: Simple ingredients and straightforward steps.

    Homemade Goodness: No preservatives—just pure, natural taste.

    Beautiful Look: The swirl of blueberries adds a stunning visual appeal.


    Ingredients You’ll Need

    2 cups heavy cream

    1 cup whole milk

    ¾ cup granulated sugar

    2 tbsp lemon zest (freshly grated)

    ½ cup lemon juice (freshly squeezed)

    1 cup fresh or frozen blueberries

    2 tbsp honey (optional, for blueberries)

    1 tsp vanilla extract

    A pinch of salt

    Step-by-Step Instructions

    Step 1: Prepare the Blueberry Swirl

    1. In a small saucepan, add blueberries and honey.

    2. Cook over medium heat until blueberries burst and form a thick sauce.

    3. Remove from heat and let it cool completely.


    Step 2: Make the Lemon Base

    1. In a mixing bowl, whisk together sugar, lemon zest, lemon juice, vanilla extract, and salt.

    2. Slowly add milk and cream, stirring until the sugar is dissolved.


    Step 3: Churn the Ice Cream

    1. Pour the mixture into an ice cream maker and churn according to the manufacturer’s instructions.

    2. When the ice cream is almost set, gently swirl in the cooled blueberry sauce.


    Step 4: Freeze & Serve

    1. Transfer the ice cream into an airtight container.


    2. Freeze for at least 4 hours or overnight.

    3. Scoop and serve with extra blueberries or a lemon slice on top!


    Tips & Variations

    No ice cream maker? Pour the mixture into a container, freeze, and stir every 30 minutes until creamy.

    Make it tangier: Add more lemon zest for an extra citrus punch.

    Extra creamy: Add a spoon of condensed milk for richness.

    Berry swap: Try raspberries or blackberries for a different fruity twist.


    Serving Ideas

    Serve in waffle cones for a crunchy contrast.

    Pair with lemon cake or cheesecake for a decadent dessert combo.

    Add fresh mint leaves for a refreshing garnish.

    Final Thoughts

    This Lemon Blueberry Ice Cream 🍋🫐 is more than just a dessert—it’s a burst of summer in every bite! Light, creamy, tangy, and sweet, it’s the perfect way to cool down and enjoy fresh flavors. Once you try it, you’ll never want to go back to store-bought fruit ice cream again.

  • Pumpkin Pie Spiced Ice Cream 🎃🥧 – Creamy Fall Dessert in a Scoop

    Introduction

    When autumn arrives, pumpkin pie spice takes over everything – from lattes to cakes. But have you ever tried it in ice cream? Pumpkin Pie Spiced Ice Cream is a dreamy blend of creamy pumpkin, warm spices, and a hint of sweetness. It’s like enjoying a slice of pumpkin pie, but in frozen form!

    This recipe is eggless, simple, and can be made without an ice cream maker, making it a must-try fall dessert for both kids and adults.

    Why You’ll Love This Recipe 🍂✨

    🎃 Seasonal Favorite: Perfect fall flavors in a frozen treat.

    🥧 Pie in a Scoop: Tastes just like pumpkin pie filling.

    🍦 No Machine Needed: Easy homemade recipe.

    🌱 Vegan-Friendly Option: Can be made dairy-free with coconut milk.


    Ingredients You’ll Need

    1 cup pumpkin puree (fresh or canned)

    2 cups heavy cream (or coconut cream for vegan)

    1 cup sweetened condensed milk

    ½ cup brown sugar (adjust to taste)

    1 tsp vanilla extract

    1 ½ tsp pumpkin pie spice (cinnamon, nutmeg, ginger, cloves mix)

    A pinch of salt

    👉 Optional Add-ins: Crushed graham crackers, caramel drizzle, or chopped pecans.

    Step-by-Step Recipe

    1. Prepare the Pumpkin Base

    In a bowl, whisk together pumpkin puree, condensed milk, brown sugar, vanilla, and pumpkin pie spice.

    Mix until smooth and fragrant.

    2. Whip the Cream

    In another bowl, whip heavy cream until stiff peaks form.

    Gently fold into the pumpkin mixture.

    3. Freeze the Ice Cream

    Pour mixture into a freezer-safe container.

    Add optional toppings (graham crackers or pecans).

    Cover and freeze for 6–8 hours or overnight.

    4. Scoop & Serve

    Scoop into bowls or cones.

    Drizzle caramel sauce and sprinkle extra spice for a cozy touch.

    Pro Tips for Best Pumpkin Pie Ice Cream 📝

    Use 100% pure pumpkin puree (not pumpkin pie filling, which is pre-sweetened).

    Adjust spice levels according to your taste – more cinnamon for warmth, more nutmeg for boldness.

    For a chunky pie vibe, mix in crushed graham crackers or pie crust pieces before freezing.


    Variations to Try ✨

    🍪 Pumpkin Cookie Crunch: Add crushed ginger snaps for spice and crunch.

    🍫 Pumpkin Chocolate Swirl: Mix in melted chocolate or choco chips.

    🥥 Pumpkin Coconut Spice: Replace cream with coconut milk for a tropical twist.

    Final Thoughts

    Pumpkin Pie Spiced Ice Cream 🎃🥧 is the ultimate fall treat – creamy, spiced, and comforting. Whether you’re hosting a Thanksgiving dinner or just craving cozy autumn flavors, this ice cream will impress every guest.

    It’s like autumn in a bowl, frozen and fabulous. 🍂🍦

  • Salted Caramel Pretzel Crunch Ice Cream 🥨🍮🍦 – Sweet, Salty & Irresistible

    Introduction

    When sweet meets salty, magic happens – and Salted Caramel Pretzel Crunch Ice Cream is the proof! This recipe blends velvety caramel ice cream with crunchy pretzel bites, creating the perfect balance of flavors and textures. Each scoop is creamy, rich, slightly salty, and delightfully crunchy – making it a showstopper dessert for any occasion.

    If you love gourmet-style ice creams but want to make them at home without fancy equipment, this recipe is for you.

    Why You’ll Love This Recipe 💛

    🧂 Sweet & Salty Combo: Salted caramel with pretzels is addictive.

    🥨 Crunchy Texture: Pretzels add a delightful surprise in every bite.

    🍦 Homemade Goodness: No ice cream maker required.

    ✨ Crowd-Pleaser: Perfect for parties, kids, and caramel lovers.


    Ingredients You’ll Need

    2 cups heavy cream (chilled)

    1 cup sweetened condensed milk

    ½ cup caramel sauce (homemade or store-bought)

    ½ tsp sea salt (adjust to taste)

    1 tsp vanilla extract

    1 cup crushed salted pretzels

    Extra caramel drizzle for topping


    Step-by-Step Recipe

    1. Make the Whipped Cream

    In a mixing bowl, whip heavy cream until stiff peaks form.

    Keep it chilled.

    2. Prepare the Caramel Base

    In another bowl, mix condensed milk, caramel sauce, vanilla, and sea salt.

    Stir until smooth and creamy.


    3. Combine & Layer

    Gently fold whipped cream into the caramel mixture.

    Pour half of the mixture into a container.

    Add a layer of crushed pretzels + caramel drizzle.

    Repeat with remaining mixture and toppings.

    4. Freeze the Ice Cream

    Cover with plastic wrap or airtight lid.

    Freeze for at least 6–8 hours or overnight.

    5. Scoop & Enjoy

    Scoop into bowls or cones.

    Garnish with more pretzels and caramel drizzle for the ultimate indulgence.


    Pro Tips for Success 📝

    Use sea salt flakes instead of table salt for the best salted caramel flavor.

    Add pretzels just before layering to keep them crunchy.

    Swirl extra caramel sauce into the mixture before freezing for ribbons of sweetness.

    Variations You Can Try ✨

    🍫 Chocolate Caramel Pretzel Ice Cream: Add mini chocolate chips for extra decadence.

    🥜 Nutty Crunch Version: Mix in roasted peanuts or almonds with pretzels.

    🍪 Cookie Pretzel Swirl: Add Oreo chunks or graham crackers along with pretzels.


    Final Thoughts

    Salted Caramel Pretzel Crunch Ice Cream 🥨🍮🍦 is a dream come true for anyone who loves the sweet-and-salty combo. Creamy, crunchy, rich, and perfectly balanced, this recipe is sure to become a family favorite. The best part? You don’t need an ice cream machine to make it – just a few ingredients, a freezer, and some patience!

    So, next time you crave something indulgent, skip the store-bought tubs and create this gourmet ice cream at home. One scoop, and you’ll be hooked! 😍

  • Tropical Coconut Mango Ice Cream Recipe 🥭🥥🍦

    Nothing says summer quite like the refreshing combination of mango and coconut. This Tropical Coconut Mango Ice Cream is a dairy-free, creamy, and naturally sweet treat that blends the richness of coconut milk with the vibrant flavor of ripe mangoes. Perfect for hot days, this recipe brings a tropical paradise straight to your bowl.

    Why You’ll Love This Recipe

    ✅ Dairy-free & vegan-friendly
    ✅ No ice cream maker required
    ✅ Naturally sweetened with mangoes
    ✅ Smooth, creamy, and refreshing


    Ingredients You’ll Need

    2 ripe mangoes (peeled & chopped)

    1 can (400ml) full-fat coconut milk

    ½ cup coconut cream (for extra creaminess)

    ¼ cup honey or maple syrup (optional, adjust to taste)

    1 tsp vanilla extract

    A pinch of salt

    Step-by-Step Instructions

    1. Prepare the Mango

    Peel and chop ripe mangoes.

    Blend until smooth to make a mango puree.

    2. Mix the Base

    In a large bowl, whisk together coconut milk, coconut cream, vanilla extract, and a pinch of salt.

    Add honey or maple syrup if you want it sweeter.

    3. Combine & Chill

    Fold in the mango puree until well combined.

    Cover the mixture and refrigerate for at least 2–3 hours to chill.

    4. Freeze Without Ice Cream Maker

    Pour mixture into a freezer-safe container.

    Freeze for 6–8 hours, stirring every 2 hours to break up ice crystals.


    (If you have an ice cream maker, churn according to the manufacturer’s instructions.)

    5. Serve & Enjoy

    Scoop into bowls or cones.

    Garnish with shredded coconut, fresh mango chunks, or mint leaves. 🌿


    Pro Tips

    Use fully ripe mangoes for the best natural sweetness.

    For extra creaminess, add 1 banana to the blend.

    Store in an airtight container to prevent freezer burn.

    Final Thoughts

    This homemade Coconut Mango Ice Cream is creamy, fruity, and tropical – the perfect summer dessert! Whether you’re vegan, lactose-intolerant, or just looking for a healthier alternative to store-bought ice cream, this recipe is a must-try.

  • 🍫 Chocolate Lovers’ Dream: Easy Chocolate Ice Cream Recipe

    When it comes to desserts, nothing beats the rich and creamy taste of chocolate ice cream. Beloved across the globe, it’s a classic flavor that never goes out of style. Whether you’re a kid sneaking scoops at midnight or an adult treating yourself after a long day, chocolate ice cream always brings joy.

    In this pillar guide, we’ll cover everything about chocolate ice cream—from its history to variations, ingredients, tips, and of course, an easy homemade recipe you can try right away.

    🍦 A Sweet History of Chocolate Ice Cream

    Chocolate was first enjoyed as a drink by ancient civilizations like the Mayans and Aztecs. When cocoa reached Europe, it became a luxury ingredient. By the 18th century, chocolate was added to frozen desserts, giving birth to the earliest versions of chocolate ice cream. Today, it ranks among the top three most popular ice cream flavors worldwide.


    Why Make Chocolate Ice Cream at Home?

    While store-bought tubs are convenient, homemade chocolate ice cream has its own magic:

    Control Ingredients – No preservatives, no artificial colors.

    Customizable – Adjust sweetness and add your favorite mix-ins.

    Fresh & Creamy – Made with real chocolate and love.

    Fun Activity – A perfect treat-making session with kids or family.


    🛒 Essential Ingredients for Chocolate Ice Cream

    To make the perfect chocolate ice cream, you’ll need:

    Heavy Cream (2 cups) – Gives rich creaminess.

    Whole Milk (1 cup) – Balances texture.

    Cocoa Powder (½ cup) – For deep chocolate flavor.

    Sugar (¾ cup) – Sweetness that enhances cocoa.

    Egg Yolks (optional – 4) – Adds richness if you want custard-style.

    Vanilla Extract (1 tbsp) – Enhances flavor.

    Pinch of Salt – Balances sweetness.

    Chocolate Chunks or Chips (optional) – For extra indulgence.

    🍫 Easy Homemade Chocolate Ice Cream Recipe

    Ingredients:

    2 cups heavy cream

    1 cup whole milk

    ¾ cup sugar

    ½ cup unsweetened cocoa powder

    1 tbsp vanilla extract

    Pinch of salt

    Instructions:

    1. Mix Dry Ingredients – In a bowl, whisk cocoa powder, sugar, and salt.

    2. Heat Milk – Warm the milk in a saucepan and slowly add the dry mixture. Stir until fully dissolved.

    3. Add Cream & Vanilla – Remove from heat, mix in heavy cream and vanilla.

    4. Chill Mixture – Refrigerate for 2–3 hours (this step ensures smooth ice cream).

    5. Churn – Pour into an ice cream maker and churn until thick and creamy.

    6. Freeze & Serve – Transfer to a container and freeze for at least 4 hours before scooping.


    👉 No Ice Cream Maker? Whip 2 cups of cream until soft peaks form, fold in the chocolate mixture, and freeze overnight.

    🎨 Flavor Variations for Chocolate Ice Cream

    Chocolate Fudge Brownie – Add brownie chunks.

    Nutty Chocolate – Mix in roasted almonds or hazelnuts.

    Mocha Magic – Add 1 tbsp instant coffee powder.

    Mint Chocolate – Stir in a few drops of mint extract + chocolate chips.

    Spicy Chocolate – Add a pinch of cinnamon or chili powder for a bold kick.


    🍪 Fun Toppings & Pairings

    Chocolate ice cream is versatile! Try it with:

    Crushed Oreos

    Caramel drizzle

    Fresh strawberries

    Whipped cream

    Chocolate sauce & sprinkles


    Tips for Perfect Chocolate Ice Cream

    Always use high-quality cocoa or real chocolate for rich flavor.

    Don’t skip the chilling step before churning—it creates smoother texture.

    For softer scoops, let the ice cream sit at room temperature for 5 minutes before serving.

    Store in an airtight container to avoid freezer burn.


    Healthier Options 🍃

    Use almond or coconut milk for a dairy-free version.

    Replace sugar with honey, stevia, or maple syrup.

    Try dark chocolate for a lower-sugar, antioxidant-rich treat.

    🌟 Conclusion

    Chocolate ice cream isn’t just a dessert—it’s pure happiness in a bowl. Making it at home allows you to experiment with flavors, keep it healthy, and enjoy a treat that’s fresher and creamier than store-bought.

    So, the next time your sweet tooth calls, skip the supermarket and make this easy homemade chocolate ice cream recipe. One scoop and you’ll realize—it truly is a chocolate lover’s dream! 🍫✨

  • Matcha White Chocolate Ice Cream Recipe 🍵🍫🍨

    If you’re looking for an ice cream that’s both exotic and indulgent, Matcha White Chocolate Ice Cream is the perfect choice. The earthy bitterness of Japanese green tea (matcha) blends beautifully with the creamy sweetness of white chocolate, creating a balance of flavors that feels gourmet and refreshing.

    Why Matcha White Chocolate Ice Cream? 💚

    Unique Flavor Fusion: Slightly bitter matcha + sweet white chocolate = perfection.

    Boost of Antioxidants: Matcha is packed with health benefits.

    Luxurious Creaminess: White chocolate makes the ice cream smooth and rich.

    Perfect for Summer or Dessert Nights: Elegant yet refreshing.


    Ingredients You’ll Need 📝

    2 cups heavy cream

    1 cup whole milk

    4 egg yolks

    ½ cup sugar

    2 tbsp matcha green tea powder (culinary grade)

    ½ cup white chocolate chips (or chopped white chocolate)

    1 tsp vanilla extract

    A pinch of salt

    Step-by-Step Instructions 👩‍🍳

    1. Warm the Base

    In a saucepan, heat milk and half of the cream until warm (don’t boil).

    2. Whisk Egg Yolks

    In a bowl, whisk egg yolks with sugar until pale and creamy.

    Slowly pour the warm milk mixture into the eggs, whisking constantly.

    3. Cook the Custard

    Return the mixture to the saucepan and cook on low until it thickens slightly (coats a spoon).

    Remove from heat.

    4. Add Matcha & White Chocolate

    Whisk in matcha powder until smooth.

    Stir in white chocolate until fully melted and incorporated.


    5. Finish the Mixture

    Add the remaining cream, vanilla extract, and a pinch of salt.

    Chill in the refrigerator for at least 3–4 hours.

    6. Freeze the Ice Cream

    Churn in an ice cream maker until creamy.

    Or freeze in a container, stirring every 1–2 hours to break ice crystals.

    7. Serve & Garnish

    Scoop into bowls or cones.

    Garnish with a dusting of matcha powder or white chocolate shavings.


    Pro Tips 🌟

    Sift matcha before using to avoid lumps.

    Use high-quality white chocolate for the best flavor.

    For an extra kick, swirl in melted white chocolate before freezing.

    Variations 🍧

    Matcha Dark Chocolate Swirl: Replace white chocolate with dark chocolate for a bold contrast.

    Vegan Version: Use coconut milk and vegan white chocolate.

    Nutty Twist: Add crushed almonds or pistachios for extra crunch.


    ✨ This recipe is modern, unique, and perfect for foodies who love creative ice cream flavors.

  • Lavender Honey Ice Cream Recipe 🌸🍯🍨 (Elegant & Soothing)

    Introduction

    If you’re looking for a dessert that’s as calming as it is delicious, Lavender Honey Ice Cream is the perfect choice. With the delicate floral aroma of lavender and the natural sweetness of honey, this recipe creates a smooth, creamy ice cream that feels both luxurious and comforting. It’s a unique flavor that will impress guests and become your new favorite summer treat.

    Ingredients

    2 cups heavy cream

    1 cup whole milk

    ½ cup honey 🍯

    2 tbsp dried culinary lavender 🌸

    5 large egg yolks

    ½ cup sugar

    1 tsp vanilla extract

    Pinch of salt

    Instructions

    Step 1: Infuse the Milk

    1. In a saucepan, combine milk, half of the cream, and dried lavender.

    2. Heat gently until it begins to steam (do not boil).

    3. Remove from heat, cover, and let steep for 15–20 minutes.

    4. Strain the mixture to remove lavender flowers.

    Step 2: Prepare the Custard Base

    1. In a bowl, whisk egg yolks, sugar, and salt until pale and creamy.

    2. Slowly pour the warm lavender-infused milk into the yolk mixture, whisking constantly.

    3. Return the mixture to the saucepan and cook over low heat, stirring, until it thickens enough to coat the back of a spoon.


    Step 3: Add Honey & Cream

    1. Remove custard from heat and stir in honey and vanilla extract.

    2. Let it cool to room temperature, then refrigerate for at least 4 hours (or overnight).


    Step 4: Churn & Freeze

    1. Stir in the remaining cream.

    2. Churn in an ice cream maker according to instructions OR freeze in a container, stirring every 30 minutes until creamy.

    3. Freeze until firm (about 6 hours).

    Serving Suggestions

    Drizzle with extra honey before serving 🍯

    Sprinkle dried lavender buds for an elegant look 🌸

    Pair with butter cookies or shortbread for a perfect dessert plate 🍪


    Why This Recipe Stands Out

    Unlike classic fruit-based ice creams, Lavender Honey Ice Cream brings a touch of floral elegance to your table. It’s not only a dessert but an experience, perfect for dinner parties, weddings, or a relaxing evening treat.